Tuesday, November 30, 2010

What a DEAL?

Hello there! Michelle M. here saying hello from Lacey Washington.


This is my first official post for Creative Charms and I am very excited. I was lucky enough to get to play with the Deal of the Month for my first assignment and boy was it fun. I have been wanting to create a LO using pictures from last year's trip to the pumpkin farm and everything in the kit just went perfect with what I had in mind.


This is my daughter Isabella admiring pumpkins. I plan on putting this LO in a 3D frame and changing it out depending on the season or what my fave LO of the moment is. I think Isabella will enjoy having this in her room.

Here are some close up pics showing some of the items included in the Deal of the Month. I really think these flowers are so fun. Perfect for fall LO's or cards.


Here I used the red gems in the middle of the flower to accent the sun giving it more dimension. I think it turned out so cute.


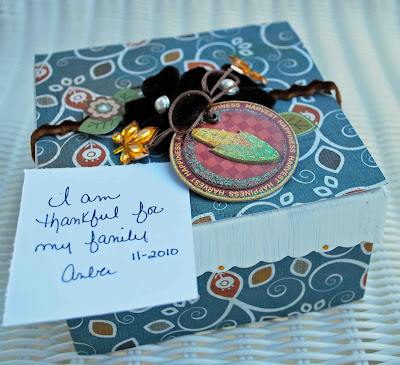
I also created a quick Thanks card that I am planning on giving to my friends coming over for Thanksgiving day. I used the butterflies and red gems to accent the card. It gives it a bit of whimsy without cluttering the card. I still need to make one more since I have 2 families coming over. Better get going with that.

Here is a close up pic.

Hey if you enjoyed what I created and want to create your own. You can get the Deal of the Month here. Believe me it has tons of stuff, I know I still have plenty to create a couple more projects.

Hope you all have a wonderful Thanksgiving Day with family and friends. Take tons of pictures cuz we cannot wait to see how you use your Creative Charms goodies with your projects.

Guest Designer

Hi Everyone! Lisa Dickinson here and I'm so thrilled to be guest designing for Creative Charms this month! I wanted to share a couple of projects I've done with a few of the fabulous products.

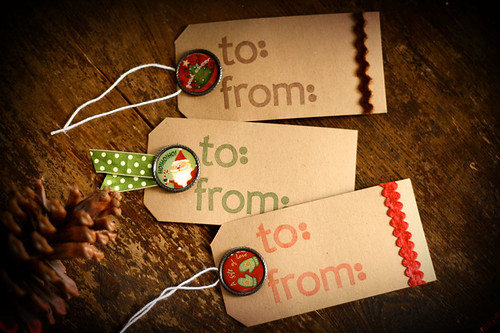
First up is an easy gift tag project using the Vintage Christmas Self-Adhesive Metal Frames. These cute epoxy and metal stickers are a perfect adornment on a kraft tag. Add some stamping and a bit of velvet ric rac, and you're done!
ccXmasTags

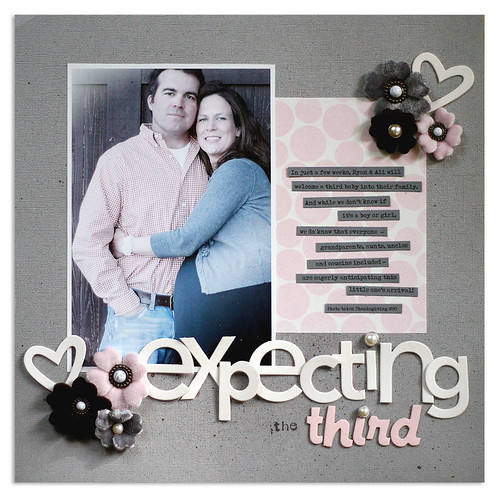
Next up is a layout I did using the wonderful Vintage Velvet Poppies. These flowers make a gorgeous embellishment on any page and the array of colors is amazing. I used the Brown Velvet, Classic Grey, and Pastel Pink on this page:
Expecting
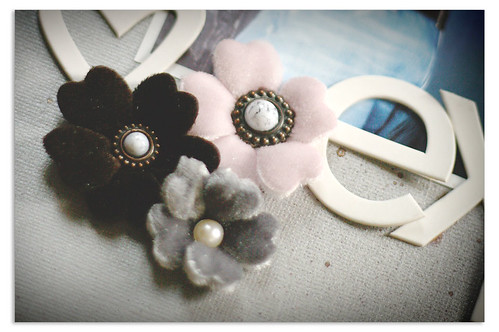
One thing I love about these flowers is that the pearl brad in the center is easily removed and swapped for a different one. I used the Vintage Marble brads in white for my flower centers. They look like little pieces of jewelry on my page and added just the sparkle I wanted:
expecting-1
Thanks for letting me share my projects with you! And be sure to check out the Creative Charms store for more beautiful accents for your holiday projects!

Monday, November 29, 2010

Seasonal "Kit of the Month" for Non-seasonal Projects

Hello!
True :D here.

Have you ever hesitated on buying Creative Charm's seasonal themed "Kit of the Month" kits because it is so close to whatever holiday that you are afraid you wouldn't be able to use it?
Well don't be! They are such a great deal and the majority of the items in the kit will work wonderfully all year long!
Here are a couple of examples of some projects that I used their November "Fabulous Fall" kit on.
Please note the non-Fall looks.  ;)


On this clean and simple card, I just used white cardstock, a piece of ribbon, some flowers, a simple sentiment, and a beautiful Light Green Vintage Jewel to add that perfect finishing touch.


These are some notebooks that I made for Christmas gifts using some Brown Vintage Poppies for the focal point...again from the Fall kit.


Isn't that poppy fabby? View all of the different colors of poppies HERE.


So...the next time you hesitate to buy a seasonal kit....DON'T!  :)
The few items that are in them that are strictly seasonal can be used as soon as you get your kit while it is still in season or, you can save them to get an early jump on your projects next time that season comes around!  :)

Hope you enjoyed my first post as a Creative Charms designer.
I would love it if you would come by my blog for a visit!
Hugs,

Layouts Galore!!!

Hi everyone and Happy Cyber Monday! Jennifer Yates here today and I've got lots of layouts to share with you! I hope you all had a great Thanksgiving holiday...after a nice break we are back to school and back to scrappin'!!! :))

On my first layout I used, what is becoming my FAVORITE product (I want them in every color!) are the Vintage Velvet Poppies!!! I also used Pink Polka dot Brads, Hot Pink and White Polka Dot Ribbon and the Gradient Pearl Stickers.

I love the look and feel of the Poppies...they are already so cute with the small pearl brad, but wanted to change it up a bit. I took the pearl brad out and replaced it with the large polka dot pink brad and then added a few of the small pearl stickers for a little more texture. It is super easy to do and fun embellishment for your pages! See some of the closeups below...

On one of my cut out flowers I also used the Pure Blossom flowers in Hot Pink...these are the cutest! I added a small pearl sticker at the top!

and another closeup of the Large Pink Brad with the Vintage Poppies...


Up next...I wanted to share a couple of layouts I taught at a fabulous scrap studio...
The Little Blue House! (Collection used for the layouts: Lily Bee)

For this layout I used the Gradient Gem Stickers in Pink on the chipboard button and in the middle of the handmade flowers on the dress form.


And another FAVORITE of mine...the Braided Daisy Medley - Yellow and the Gradient Gems White were used on my "GROW" layout.


The Gradient Pearls were the perfect touch on the butterflies and the large flower!

That is all for me today! Hope you all have a great week!

Jennifer
Visit me at: The Pink Room

Friday, November 26, 2010

Treats to Satisfy Your Sweet Tooth


Treats for Your Sweet Tooth!
Hello all you Creative Charms artists and friends out there! This is K Andrew posting for the first time on the fabulous Creative Charms blog, where lots of inspiration and delightful projects await each day.
I absolutely adore sweet treats of any kind, candy, cookies, cakes, mmmmm! The sweet tooth collection was the perfect treat minus all the guilt! A guiltless pleasure for me, and I really got on a roll (cinnamon roll, tootsie roll, you get the idea) with lots of "sweet" projects using this fabulous collection!

Ingredients used in these sweet projects: (click each one for more info)
Brown fancy polka dotted ribbon
Red fancy polka dotted ribbon
Sweet tooth felt embellishments and brads
Sweet tooth epoxy stickers
Red ruffled flowers from the Deal of the Month


Mini Candy Bar Wrapper & Lollipop Holder
The first project I created was candy covers. I created a mini candy bar wrap and lollipop holder. I love wrapping candy bars, because it takes an entire two minutes--but it takes a bit longer to open....so they stay pretty for a little longer in my candy dish!


Crepe Nut cup
Next I created nutcups for each of my place settings at my table. My children absolutely love to come to dinner each night and see what might be left for them in the seasonal nut cup. I change the colors and decorations of my tablescape often. It's just the right size for tucking in a chocolate, treat, note, or other small treat.


Sweet Holiday Tag
I love to create tags! These tags are often tucked into books, onto a gift, in a letter, and even made into books. I love to create them because they are so very quick and versatile.


Felt Gift Card Holder
Next on the agenda, was some gift card holders. I think gift cards are popular with adults and older children. Atleast they are in our family, and they very easy to mail, which is a plus. This particular gift card holder, I created using felt, and it can even be used in your purse to hold calling cards or even a bit of cash--but who has any of that left during the holiday?! lol


Sweet Envie
Then I decided to create some tiny treat or money envies. I love these tiny brown bag envelopes and use them often to hold tags, journaling, treats, etc. They make a great candy cane holder too!


Recipe Card & Holder
I then decided to work on a few of my recipe card holders. I absolutely love cookie exchanges, so the Sweet Treat embellies are perfect for this! The wrap holds a recipe--so it's perfect when someone asks you for a recipe of yours. You can deliver it in sweet style.


Tag Holder
Lastly I finished up my sweet tooth binge by creating a tag or card holder. What you can put in this roomy holder is endless--candy canes, candy, gift certificate.....

I hope you enjoyed a few of these sweet treats and can use them in your holiday gift giving. Thank you for allowing me to share a bit of my creative charmed day with you. May your day be creative, charmed, and blessed.

All the Cricky Best,
KAndrew of Getting Cricky

Tuesday, November 23, 2010

Black Friday Weekend Special

Who Wants Free Stuff?!?


We are having a sale on the website! From tonight through Sunday night get either a Free Deal of the Month or Kit of the Month. Spend $20 and get November's Deal of the Month for free (6.99 value) or spend $35 and get November's Kit of the Month (Winter Wishes) for free (14.99 value).

Vintage Brads and Velvet Poppies...

Happy "almost" Thanksgiving everyone! I am here to post a layout of my daughter Courtney, granted I "lifted" the layout design from my ultra-talented friend, Danielle Flanders, and it's relatively the same except for a couple of small changes. I used Vintage Velvet Poppies and green Vintage Brads. I simply popped out the pearl center of the flowers and replaced it with the vintage green brad and I think the combination of those two really add a nice touch of "softness" to it and I' love how it turned out. It almost looks like my daughter is wearing a flower in her hair. I hope you enjoy!

Courtney

Stitched_Stem_Brown_shabbymissjenndesigns

Courtneycloseup

Courtneycloseup2

Have a wonderful Thanksgiving everyone! ;)

Sig1

Monday, November 22, 2010

Custom Bows and Cards

Aloha! Joscie (rhymes with bossy) here, checking in for the first time on the Creative Charms blog. I am so glad to be here! Today I've brought a bow, and two cards to share.
Book Paper Bow
I used my Tim Holtz die to cut 5 book pages into these strips.

I folded and threaded them onto this Velvet Velvet Poppy Brad.

I used a glue dot to adhere the bow to the top of the gift box.


Fabulous Day Card

I punched a book page circle with an EK Success Circle punch and layered a Kraft punched Martha Stewart flower shape together and punched a hole in the center. I inserted a Vintage Pearl Brad in the center and used a glue dot to adhere it to the top of the rosette.


I used Tim Holtz dies for the kraft rosette and the fancy background shape. A sentiment stamp by Paper Trey Ink. at the center: Vintage Pearl Brads. Here is another variation with old maps:

Snow Flake Card

Silver Doily, Tim Holtz rosette, Laina Lamb Die cut snow flakes, Glitter Glue, Gradient Gems in Blue.
I hope you've enjoyed these items!
Love-Love and Blog you Later,
Joscie, rhymes with bossy

Friday, November 19, 2010

Blessings

This time of the year we look back on all we've been blessed with.  Thanksgiving is such a cozy holiday spent with family, reflecting on the past, and thinking toward the future.  I wanted to make something to capture these Thanksgiving blessings, so I made a Blessing Box. 


To make my Blessing Box I used a small cardboard box, patterned paper, paint, and the November Kit of The Month-Fabulous Fall.  The beautiful Autumn bling in the Fabulous Fall Kit was perfect to embellish my box.  I made a small slot in the top of my box so family and friends can drop their notes in. 


This is the perfect gift for your Thanksgiving hostess...that is if you plan on giving your box away!  And no gift is complete without a card!  Take a look at my "Gobble Gobble" card:


I'm loving this little glittery Gobbler!  The Fabulous Fall Kit has tons of embellishments that are perfectly coordinated for Autumn projects.  Love all the rustic colors and shine.


I'm so happy to finally have a place to put cherished blessings. 

Wednesday, November 17, 2010

New Installation of One Product for Four Projects

I am here today to show you how easily you can create FOUR projects using ONE package of Creative Charms products! 
For these projects I used the Thanksgiving Multi-Dimensional Chipboard Stickers

1.  Fall Goodie Bag:

2.  Thanksgiving Table Place Card...just how cute is that turkey!?

3.  A Fall Card

4.  Fall Tag

These stickers are just adorable and there is so much already added to them!  They really make for some super cute and quick projects! 
Related Posts Plugin for WordPress, Blogger...