Thursday, December 30, 2010

Birthday Wishes from Tilda!


This Birthday card features one of my favorite little Tilda's from the Magnolia Stamp Collection.  These little cuties just can't help but make you smile!  She is accented with the blue Fancy Polka Dot ribbon and the blue Fancy Felt Flowers.  Aren't they just the cutest flowers you have ever seen!  Also used a MS edger punch for the lacy edge and Spellbinders Nestabilities to cut the scalloped circles.  Paper was from an old DCWV paper stack. 


I also made a few of these adorable Tissue Covers for Christmas gifts this year.  I used a Winter Theme so they could be used beyond the Holidays. The snowflakes are in the Winter Medley set of the Seasonal Medley collection and layered over the punched snowflakes from blue glitter CS.


They are accented with the Gradient Gem Stickers to give them more sparkle and are also added to the snowflakes on the top border.  The panels on the tissue cover are embossed using the Cuttlebug embossing folders and inked to bring out the embossing.  These were a big hit with the recipients!

Tuesday, December 28, 2010

Christmas Goodies

Hope you had a wonderful holiday! We sure did at our house ~ we had Santa visit our home on Thursday and had Christmas Eve & Christmas Day at our home! It sure was fun.

I had some time to create these gift bags & pillow box before all the festivities.
This first one features Gradient Gems & Gradient Gem Brads.


I cut this pillowbox on the Cricut using SCAL (Sure Cuts Alot). It is a SVG from SVG Cuts. I added Gradient Gems to accent the snowflakes.

Here is a bag featuring the manger scene - all elements were paper-pieced and I added Creative Charms Gradient Pearls to accent.

Last but not least a layout featuring Vintage Velvet Poppies, Gradient Gems & Vintage Jewel Brads. Sketch is from the ever so talented Debbie Gaydos, a CC designer.


As you can see I have two wonderful boys which make Christmas and Every Day a Joy!
Have a Happy New Year!

Amy

Monday, December 27, 2010

Some Cards With the Dec. KOTM ~ Plus a Quick Video Tutorial

Hi Everyone!
True :D here.

It is my turn to post and I have created several cards with Creative Charms beautiful December Kit of the Month. I do hope when you are finished checking out my post that you will scroll down and see all of the awesome projects the other girls have created to inspire you.

See the video below to see how I colored them to match the designer paper and beautiful golden ribbon.


The set below uses the Vintage Brown Velvet Poppies and their Light Green Vintage Jewels.


Here is a very quick tutorial showing you an easy way to color your embellishments to match your other card elements.


Thanks so much for dropping by!
I would love it if you would come by my blog for more details, and to see what else I have been up to.  ;)

Hugs your way,

Sunday, December 26, 2010

Maligayang Pasko, Merry Christmas, Happy Holidays, Happy Quanza, Happy Hanukkah!

Hello everyone!
Michelle M. here with holiday greetings. Trying to cover all my bases and I know there's more but that is all I could come up with right now. Hehehe! Anyway, hope you all had a wonderful holiday break, spending it with the one's you truly love, family and friends. Opened some wonderful gifts! Ate some awesomely good food and specially those yummy desserts.
While you read this, I on other hand is either in a coma from eating all of my MIL's awesome tamales or my mom's delicious filipino food or I am on the road starting an 18 to 20 hour drive home from California to Washington State. I know...craziness! But don't feel sorry for me, cuz we got to spend some time with family and friends, my kids saw their fave cousins and played, had a great time and got wonderful presents. And that is the most important thing right? Being with family spending some quality time.
Ok, now that I got to vent let me show you what I got to work on before leaving for the holiday break. I got the Deal of the Month for my assignments and I had a great time with this one. I think if I had more time and wasn't so busy with the holiday stuff I would have sat my butt down and created more projects. Alas this is what I was able to accomplish.
She's my SNOW angel!

I wanted to use tones of blue's and bits of browns to match my daughter's snow hat and was having trouble finding something that would work. When it comes to holiday paper the colors are mostly red, green and white. So I had to come up with something that would work with my pictures. Here's a teeny tiny tutorial of what I came up with.
I used Basic Grey Fruitcake line and stamped some snowflake images in different sizes with Chestnut Roast Color Box Chalk ink. Which is my all time fave to work with. I just stamped randomly in places where I knew it would show. The middle part I wasn't too worried since it would be covered up with the pics anyway. I did used the middle part though to practice my stamping or take some of the chalk off.

Here are some detailed pics of the snow flakes. I used the Snowflake ribbon from the KIT, cut them apart and layered them with the Winter Sparkler and placed them in the middle of the cut out flakes from the paper line. I was glad it worked out! I then placed more of the cut out snowflake ribbon here and there to create the look of falling snow. I added some blue gradient gems in the middle of some of the snowflake ribbon for added dimension.

Peace * Joy * Love

Using the same paper from Basic Grey Fruitcake Line. I created this card. I added a white gem brad and snowflake from the kit to add more interest to the flower. Also added some blue gradient gems in the tittle just to add more bling. Got my punches and stamps out for the layers and tittle of the card. And that's it.
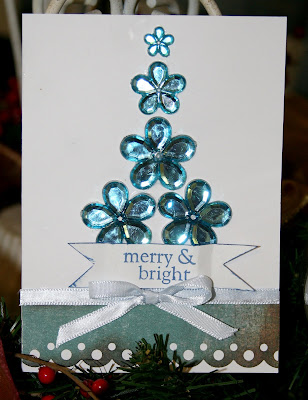
Merry and Bright

Here is the last card I was able to do. I wanted to create a Christmas tree and wanted it to be the focal point and nothing else. I really wanted it to be simple to show how versatile the kit is and this is what I came up. With a simple paper cut from my border punch to create a base, I then added a ribbon to doll it up a bit, I then just placed my pure blossoms in a shape of a tree then glued. I stamped the merry and bright for the greeting and that's it. I was done.

I seriously wish I could have had more time cuz I was really having a great time using this kit. I hope you all enjoyed my post as much as I did creating them. And if you have some Christmas money left over I suggest you get the kit cuz you will not be sorry.

Saturday, December 25, 2010

Winter Wonderland

Merry Christmas Eve!
And here in Snowy Edmonton, Alberta Canada
it is about minus 20 degrees celcius,
and it is defintley a "Winter Wonderland"
What a better way to spend a chilly evening,
then creating Christmas Projects with the December kit "Winter Wonderland"
with my daughter India.
The first one we made was this SNOW gift tag.
We used the snowflake trim and also added the snowflake bling ion top of it.
Lots of sparkle and snowflakes!
The next project I created was this vintage inspired ring.
It took all of 5 minutes and is to-die-for.

I used a vintage embellishment, cut off the backing and used e-6000 glue to a ring blank.
Here's a close-up.
I love these vintage embellishments. they are my new obsession.
I used one on the center of the sentiment on this Holiday card.
I used one as the bow centre on this card.

And another on the wreath bow on this last card.

We finished off our crafting time with a couple of Gift tags
I used a gemstone brad from the winter kit on this tag.
And my 9 year old daughter made this one using the gemstones for the snowmans eyes and buttons.
( I promised I share this tag. She says it's her best work)
Have a great day tomorrow, and enjoy the Holidays.

Wednesday, December 22, 2010

Walking thru a Creative Wonderland!


A Warm Hello to all of our dear Creative Charms artists and friends out there! This is K Andrew posting today on the fabulous Creative Charms blog, where lots of inspiration and delightful projects await each day.
It's absolutely warm and delightful at Creative Charms this wintry month, and Creative Charms has given us a little bit of a Winter Wonderland with the December Deal of the month. Each frosty treasure delights and will give you a wonderful taste of winter!
The deal of the month is filled with chilly gems, glistening snowflakes, sparkly flowers, luscious trims, and more!
I was thrilled to work some icy magic creating both a tag and layout....having a bit of winter was just what I needed living in Florida! Thank you Creative Charms!


ALL Creative Charms products used today are from the Deal of the Month.

For my tag above, I created a tag from white cardstock, added a quick paper Let it Snow title, and then added the beautiful Creative Charms Snowflake Trim, topping each snowflake with clear & blue gradient crystal gems from Creative charms. I then added the beautiful frosty blue flared flower from Creative Charms.

For my layout above, I simply used blue and white cardstocks, along with more of that beautiful irridescent snowflake trim from Creative Charms, the pure blue blossoms, white & blue flared flowers! I added gradient gems to bling up each pure blue blossom.
Lastly I created decorative pins using Creative Charm's tiny star beads from the Gem Garden line, and added some clear snowflakes from the Seasonal Sparkles.
All you need is a bit of paper, ribbon, and the Deal of the Month for December will take care of the rest.

So go ahead and indulge your sweet tooth with some frosty treasures from the Winter Wonderland Deal of the Month  for only 6.99 till the end of the month.

Have a wonderfully creative day from all of us here at Creative Charms!

Christmas Box with Matching Card

I love finding unique ways to package gifts and creating my own boxes and gift bags is even easier with Creative Charms!  Just look at how adorable this little snowman is from the Christmas Multi-Dimensional Chipboard Stickers

For this box you will need two 12x12 pieces of cardstock.
On both pieces, score at 2" and 10" then turn and score again at 2" and 10".
Cut on the score marks to form tabs.
Glue the two sides together from each cardstock piece, then adhere the other two sides.
Glue the bottom of the box shut, tucking the two small tabs in first.
You can either tuck the top shut with double sided tape -or- cut two small tabs off and then fold the two long sides back and tape to the box as I have in the photo above!

The box is 8" x 8" x 2-1/4" when completed.

Supplies:
Cardstock/Pattern Paper:  Textured (Momenta)
Chipboard:  Christmas Multi-Dimensional Chipboard Stickers (Creative Charms)
Ribbon:  Velvet Red Ric Rac and Snowflake Ribbon from the December Deal of the Month (Creative Charms)
Embellishments:  Seasonal Sparkles Stickers and Gradient Gem Stickers (Creative Charms)
Pen:  Signo White (Uniball)
Punches:  EK Success and Creative Memories
Misc: Crystal Stickles

Tuesday, December 21, 2010

Creative and Charmed Gift Card Holders

Hello! The countdown is definitely on at my house - 4 more days until Christmas! I cannot believe it!!! My little guy is filled with anticipation and excitement as we prepare to celebrate our Savior's birth! Ok, I admit it, he is also looking forward to a visit from the jolly guy in red! :o)

My little guy likes to get gifts but
he loves to give gifts - he has such a big heart and I am thankful for that. He wanted to get his teacher, the principal, the school secretary and his music teacher something for Christmas. After much discussion we settled on gift cards. I told him that since they are all girls and that I had the pleasure of using the beautiful December Kit of the Month - Nouveaux Vintage that I would create some gift card holders for these special women in his school family. Yippee, time to play with my Expression!!!

I created the following 4 different gift card to holders for the previously mentioned ladies and I still have a lot of product left over to continue creating! Order your kit today if you didn't order it yet - you won't be disappointed with all of the creative goodness in this kit!
From left to right:

The first is a little purse that I decorated using a Vintage Poppy with Pearl Brad - VINTAGE BROWN, some Soft Spoken Christmas stickers from my stash and for the purse strap I used Velvet Ric Rac - BROWN from the kit.
The next gift card holder is one that I have been wanting to try to create for a while now and just purchased a perforation blade for my cutter! I tried to make one of the fun zip boxes that you can buy at the card store - they are too fun! I used my expression to cut out a box and used the perforation blade to create the tear off top. I decorated the box using some stickers from my stash, a Vintage Poppy with Pearl Brad - IVORY (I replaced the pearl brad with a Vintage Jewel - LIGHT GREEN) and put a Vintage Jewel on the pull tab. I will have to let you know how it goes after Christmas. Check out my blog Scrappin' Mom of 1 after Christmas for the results!
The last two gift card holders are more of your basic holders but turned out very nice with the products from the kit.I placed some more stickers from my stash and a Vintage Poppy with Pearl Brad - VINTAGE BROWN (I replaced the center with a Gradient Gem Sticker - GREEN and placed one on the flap too - these are not included in the kit) on the white holder on and some stickers and a Vintage Poppy with Pearl Brad - IVORY on the red holder.

Thanks for looking at my December projects!


Wishing you and the ones you love a very Merry Christmas and a Happy New Year!

Sandra :o)

Monday, December 20, 2010

Easy Holiday Decor

Aloha Creative Charms fans, it's Joscie, rhymes with bossy checking in with a few holiday projects. I know it's almost Christmas and you've probably already got your decor set but I want to share with you an ever changeable piece you can use year round.

I picked up this 7 gypsies photo holder from a local scrapbook store and knew it would be easy to decorate and change up as the seasons change.

  • I started out by printing up 3 patterned papers from Miss Mint’s Cherry Berry Christmas on American Crafts Textured Cardstock.
  • I cut them at 4x6.
  • I embellished each piece.

  • I added silver stickles to some white thickers numbers
  • Punched an oval out of silver paper
  • I added a velvet Poppy and Pearl Brad to the edge of the oval
  • I added Gradient Pearl Stickers from Creative Charms around the edge of the oval
  • When the stickles were dry I stuck the thickers in the middle of the oval
  • I adhered the oval to the patterned paper
  • I adhered a silver doily to the patterned paper and cut off the edge with my paper trimmer
  • I added a rosette to the center of the doily
  • I added a vintage jewel to the center of the rosette
  • I tied a big bow with silver satin ribbon and added a Stick Pin from Maya Road

  • I added a Christmas gift bag to the patterned paper, trimmed off the excess
  • I pleated a little piece of pink ribbon and stitched it down with my machine
  • I machine stitched around the entire edge of the card
  • I added a vintage jewel to the top of the tree

In photoshop I opened a landscape family photo and changed it to black and white.


I set the crop tool to crop a 4”x6” 300 dpi of the left side of the photo.

I printed this on a 4x6 borderless print on my printer.

Ctrl-Z to undo the crop and re crop at 4”x6” 300dpi of the right side of the photo.

I printed this photo on a 4x6 borderless print on my printer.

I used a single glue dot to adhere each print or embellishment to each photo area for easy removal later.

I also altered some wooden snowflakes:

Thanks for stopping by!

Love Love and Blog you Later,

Joscie, rhymes with bossy!

Friday, December 17, 2010

Creative Packaging

Hi everyone!  Amber here today, sharing a few last minute holiday ideas!  Are you ready for Christmas?  Are all of those gifts wrapped and beautiful?  If not, I've got a few tips on adding some "creative charm" to your packages to make them fabulous! 

This month I focused on the December Kit of the Month, Nouveaux Vintage.  It is a darling kit, full of vintage charm. 


I am taking part in a gift exchange this December that focuses on packaging.  I wanted my entire gift to have a vintage theme.  I started out by making a card.  I added a doily, stamped sentiment, a small piece of patterned paper, ribbon, and one of my Vintage Velvet Poppies.  A very simple card, took less than 10 minutes to make. 


Up next, my packaging.  I used glassine and brown bags to hold some scrap goodies and added embellishments and ric rac from the Nouveaux Vintage Kit.  It helped to coordinate each of my finished bags and just looked great.  Plus the recepient can recycle the packaging to make things. 


To finish things off, I put my gift in a box and wrapped it with brown shipping paper.  Love this stuff!  Cheap and so antique looking!  I kept the outside simple by wrapping red and white checked ribbon around the box, tied a bow...and topped it with another Velvet Poppy.  Add a twig of leaves and you're all done! 


How you package your gift is as important as the present itself.  With Creative Charms and the Nouveaux Vintage December Kit your wrapping problems can be very simple and creative!  Plus, did I mention how much the December Kit sales for???  Only $14.99!  125 pieces for that great price.

Enjoy!
Related Posts Plugin for WordPress, Blogger...