Thursday, October 28, 2010

It's in the Contrast

Make the most of this month's Deal Kit by using contrasting colors. Greens and blues really help the yellows and oranges in this kit pop of the paper.


For this first card used pattern paper that had a mix of blues and green and paired it with a few of the great butterflies that were included in this month's kit. I then accented the punched strip at the bottom with amber gem stickers and pure blossoms.


For this next card I added more pure blossoms to the centers of the flowers on the pattern paper to give it more dimension. Gradient Pearl stickers in the center of each blossoms gave them an extra pop.


Thanks for stopping by and have a great weekend!

Lisa

Tuesday, October 26, 2010

Halloween Day is not Far Away!

Wow! I cannot believe that the month of October is almost over and that Halloween is just 5 days away! This is the last week to order the Kit of the Month and the two Deals of the Month!

I have had a lot of fun working with the O
ctober Kit of the Month-Vintage Halloween: earlier this month I created a two page layout using the kit of the month and today I am back with my second October project and again I turned to my kit to create a paper bag mini album and two gift card holders! There is so much product in this kit for such a fantastic price of $14.99! If you have not yet ordered it, don't delay, order it today!!!

I have a wonderful Aunt who lives in Flori
da that we don't get to see that often. She just adores my little guy so I like to keep her updated with photos because he is growing up so fast! I made a mini album using one brown paper bag folded in half and I have prepared it so that it is ready for pictures from this weekend and then ready to send to her. I also made two Halloween gift card holders for my niece and nephew who are now young adults. I think that they will like a gift card for food, fuel or music with their candy!

I love to make paper bag mini albums. It
is great way to share photos from a holiday or event with friends and family! For all of the pages I used my expression and the Plantin Schoolbook cartridge to cut five 4.75 squares.

For the cover: I used the Designer's Calendar cartridge to cut Halloween 2010 and the Simply Sweet cartridge to cut the green background for the word Halloween. I tied Black Vintage Velvet Ric Rac and Black Fancy Polka Dot ribbons, both from the kit to bind the mini album. I then added one of the adorable Halloween Vintage Frames that says Boo to You from the kit and of course I had to get the Gradient Gem Stickers-Black from the kit and some Gradient Gem Stickers-Amber from my stash to add some bling!

Inside the mini album I used three Halloween Twinkle Stickers from the kit on the left page just above the photo mat. I just love these fun and sparkly stickers! On the right page I once again reached for the Gradient Gem Stickers-Black to add to the left of the costume sticker and to the little pumpkin sticker that was plain until I gave him black bling eyes and drew on a nose and a mouth.

the left page:the right page:
But wait, this is not the last page! When I folded the bag I left the open end to the back so that I could add a pull out page at the end. I attached the pull out page to the inside of the bag using a piece of Black Fancy Polka Dot Ribbon so that it is easy to pull out the page and slide the page back in without falling completely out of the bag. I created a pull tab by simply cutting a small rectangle from black cardstock, scoring it down the center so that it could be easily folded, folded it along the scored line, used a corner rounder on the corners of the tab and adhered it to my pull out page. I used some Halloween stickers and some Gradient Gem Stickers-Black to finish the pull out page.


the pull out page:
Here are the gift card holders that I made for my niece and nephew:

The first one I made a little more masculine for my nephew using a Halloween Vintage Frame that says Ghost to Ghost from my kit, a Happy Halloween sticker that I had, and a round epoxy bat sticker that I had with a Vintage-MakeItYour-SelfAdhesive-Metal-Frames.

The second gift card holder I made more feminine for my niece using a Black Vintage Velvet Poppy (pearl center brad removed) and some black Vintage Velvet Ric Rac ribbon from the kit, three Pure Blossoms-Amber from my stash and three little Gradient Gems Stickers-Black in the center of each Pure Blossom.


There really is a lot of product in this kit! Check out this kit and all of the great products at creativecharms.com

Thanks and make it a great day! :o)

Monday, October 25, 2010

Cosmo Cricket Week


Hi, it's Diane and I am excited to tell you about a new feature on the Creative Charms blog.  This week several Design Team members will be sharing projects that we made combining Creative Charms with Cosmo Cricket paper lines.  Each month we will feature different paper lines and show you how they work with Creative Charms embellishments.  I was sent papers, chipboard and stickers from the Cosmo Cricket "DeLovely" line for this month.


The DeLovely papers are bright and cheerful in shades of pink, yellow, green and teal blue.  As a Cole Porter fan, I enjoyed the clever way each paper has a "De" name.


The papers are all two sided and there is a reminder to look at the other side printed along the bottom of each sheet!  It is sometimes difficult to choose between the two sides but if you are making cards you can use both (or just buy more paper...).

I had a lot of fun looking through my Creative Charms stash for items to compliment the papers - it was great to find some near perfect matches.  For today's cards I did not use the Cricut - just the papers and embellishments and some solid colored cardstock for the card bases.  All of the cards I made are A2 size.


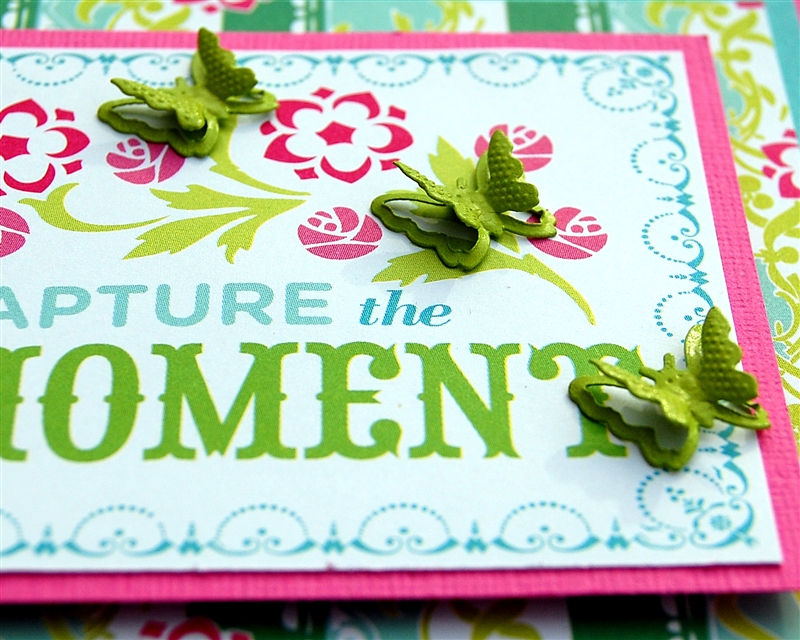
One of the paper in the collection has borders and another has elements that can be cut up for sentiments and titles.  "Capture the Moment" works perfectly with these green butterfly brads from the 3D Sparkly Garden Brads set.


The butterfly color matches the brighter green used in many of the papers in the line.  They also work with this sentiment particularly well - reminding us to enjoy the special moments in our days (when we see something lovely like a butterfly).


For the next card  I used a few more paper elements along with this adorable turtle chipboard sticker.  I smile every time I look at the turtle!


The flower element has these cute faces but I didn't want so many faces on the card so I used some Pure Blossom flower gems, along with flowers from the Seasonal Medleys and Gradient Gem Stickers for the centers.


The blinged out flowers add a  lot of sparkle to the card.


This simple card combines the stylized rose chipboard stickers with the coordinating paper and a sticker from the collection.  A few Gradient Gem Stickers added to the roses and the points of the label add interest and sparkle.


I layered the chipboard stickers to create more dimension and interest.


The little bird on this paper element has a sweet expression and the sentiment is yet another echo of the "lovely"' theme.


I added some daisies from the Seasonal Medleys and placed a large gradient gem sticker on the yellow centers for more sparkle.


Clear gem sticker centers on two sparkle buttons that I had left from the September Deal of the Month (girl) highlight the large flowers in the background paper at the top of the card.


For the next card, I cut off a section of three circles from one of the border strips and added a pink flower from the Groovy Petal Medley to the center circle.


For the top and bottom circles I added a flower brad (also left from my September Deal of the Month package).


A small gradient gem sticker in the center of each flower adds more interest.


More small gradient gem stickers in alternating shades of pink balance the sparkle on both sides of the card.

This cute caterpillar would put a smile on anyone's face.  It is fun to work with so many different paper patterns and find that you almost can't go wrong as you combine them in your projects.


I used the "Bloom" element and added some more flower brads and gem stickers.


Finally, here are two medallion cards that are enhanced with a gem brad and gem stickers.  The medallions are punched with the Martha Stewart "Cherish" Punch Around the Page set.

I hope you enjoyed these simple cards.  I had a great time just trying different paper and embellishment combinations and I know that I can make many more cards (and some other projects) with this collection.  I'll be posting these soon on my personal blog, Capadia Designs.

Friday, October 22, 2010

Merry, Merry!!

The holidays are just around the corner and time to start thinking about Christmas cards.  I usually make all of my Christmas cards and have already started.  Hope to have them done by Thanksgiving and in the mail by Black Friday....


This card was created using the October Early Christmas Deal of the Month.  I just love the Fuzzy Daisies and used it on this card to make a poinsettia by pinching the ends.  Added the Clear Vintage Jewels for the center and colored with copic markers to make it look like the yellow brachs in the center.  For the background I used the Sizzix Powdered Sugar embossing folder and cut the holly leaves on my Cricut expression using the Make the Cut software.  For the sentiment I used a Rubber Stamped stamp and punched it out with the SU oval punch and added the green background with a SU scallop oval punch.  Added some red ric rac ribbon and backed this all with green glitter cardstock.


Here are some Christmas Cards I made for World Card Making Day.  On this one I used one of the new Creative Charms Christmas Twinkle Multidimensional Stickers for the sentiment.


JustRite Christmas1-20100001


This card uses the new Vintage Accent Frames to make my own embellishments.  Also used the JustRite Hearts Come Home stamp set for the center. The bottom border was created with a MS border punch.  Used Bazzill CS for the card base and SU designer paper from last year.

I love how these embellishments make card making so easy and so quick.

Thursday, October 21, 2010

It's A Jungle

Here is a baby name collage I created for my coworker. Her first grand daughter made her debut in September.

I used the new Vintage Jewels from Creative Charms. The tear drop shapes were perfect for the elephant and the flowers are a nice to touch to make the collage more appropriate for a girl.

The shadowbox frame is from Joanns - they come in black and I paint them white.

Click on image to enlarge:


Here are few closeups of the collage:


Thanks for stopping by!
Amy

Tuesday, October 19, 2010

happy Fall!

Hello! I hope that you are all enjoying the cooler weather of fall.

Where I live the leaves are changing colors and we are excited for the festivities of the holidays to come.

Fall is one of my favorite times of the year and the new Creative Charms embellishments are perfect for scrapping about these occasions.


I also created a simple little card using some more of the new Halloween multi-dimensional chipboard stickers. 


Thanks so much for stopping by the Creative Charms blog today. Please check out all of the cute embellishments available at the online store:


Monday, October 18, 2010

October's Kit of the Month - Goodie Bags


With October's Kit of the Month, I decide to create a couple mini gift bags. I personally think these would be perfectly for holding candy! I love this time of the year - my kids only like gum and suckers so all the other goodies go to Mom and Dad.....sweet! On the first bag I used the Gem Stickers and a Halloween Twinkle Sticker. On the second bag I again reached for the Gem Stickers, because I like shiny stuff! I then used a Vintage Velvet Black Poppy (removed the pearl brad from the center to save for a future project) and used a Halloween Vintage Frame as the flower center.

Ok, now I'm hungry for candy...off to raid the what I bought for the trick-or-treaters!

Saturday, October 16, 2010

Primitive Halloween Tag Ornaments...

I just LOVE making ornaments. I really do! I'll make them for every Holiday all year round. There's just something so sweet about a teeny piece of handmade artwork hanging from a little tree nestled in the corner of your home. When these Halloween Vintage Metal Frames landed on my doorstep, I knew exactly what I wanted to do with them. I made some primitive tag ornaments and these were so, so, so easy to do. All I did was take white shipping tags, soak them in walnut ink then laid them aside to dry and while I was waiting for them to dry, I took 3 Halloween Metal Frames and 3 bottle caps, adhered the two together with Crystal Lacquer then set those aside to dry as well. When all the pieces were dried, I glued the bottle caps to the tags and stamped my sentiment above. That's it! Sooo easy, and so fun to do as well. I hope you enjoy! Happy Halloween everyone!! :)

Friday, October 15, 2010

Fall Fun!


Here we have a simple Birthday card created using a scallop square front cut on my Cricut Expression using Make the Cut Software.  I used the Fall Harvest Deal of the Month adding the  Yellow Fancy Polka Dot Ribbon, Amber Pure Blossoms and Orange 3D butterflies.  The sentiment and background flora are from SU Watercolor Trio and sentiment was punched out using the oval and scallop oval punch and then pop dotted on for dimension. CS is Bazzill.


This layout was made using the Orange Fuzzy Daisy Kit (love the leaf ribbon!) and the Amber Gem Stickers.  Also added the new a Fall Sticker from the Thanksgiving Multi-Dimensional Chipboard Stickers.  These adorable chipboard stickers are perfect for the fall and Thanksgiving. 

This was an amazing Deal of the Month, so much to choose from in this deal!  Happy Fall Y'All !!
Related Posts Plugin for WordPress, Blogger...